Hello all who are interested in Deep Learning! I am happy to see you here!
Today I will write about my experience with Convolutional Neural Networks! I will describe here how to get image description. The image description will be consist of two parts. First one is summary about objects in the image, that are all classes that ConvNet found with given probability and number of objects per each class. Second part is type of activity in the image. First part of image description may be solved by detection task. I will use for it SSD algorithm. Second is classification task. For this task I will have to train CNN using pretrained model from ImageNet and apply transfer learning techique. Caffe framework will help me with all tasks.
This is a main post about Classification and Detection methods using Convolutional Neural Networks. I decided to go deeper and analyse my whole test set. The analysis about distribution of classes with different certainty of model you may read in
- Part2 The plot of distribution per classes with different levels of probabilities is in the
- Part2.2 If you are interested in some details or additional information about training process, please read
- Part3
Let’s start!
First step is importing all libraries and setting up necessary version of Caffe.
import numpy as np
import matplotlib.pyplot as plt
import pandas as pd
import os
import sys
%matplotlib inline
plt.rcParams['figure.figsize'] = (20, 20)
plt.rcParams.update({'font.size': 22})


caffe_root = '/home/veronika/materials/cv/detection/caffe/examples/'
sys.path.append('/home/veronika/materials/cv/detection/caffe/python')
sys.path.remove('/home/veronika/caffe/python')

import caffe
/usr/local/lib/python2.7/dist-packages/matplotlib/font_manager.py:273: UserWarning: Matplotlib is building the font cache using fc-list. This may take a moment.
  warnings.warn('Matplotlib is building the font cache using fc-list. This may take a moment.')
It is very important to mention here, don’t forget to install caffe from the git. And check do you import correct version of caffe framework.
caffe.__file__
‘/home/veronika/materials/cv/detection/caffe/python/caffe/init.pyc’
from google.protobuf import text_format
from caffe.proto import caffe_pb2


labelmap_file = '/home/veronika/materials/cv/detection/git/labelmap_voc.prototxt'
file = open(labelmap_file, 'r')
labelmap = caffe_pb2.LabelMap()
text_format.Merge(str(file.read()), labelmap)
<caffe.proto.caffe_pb2.LabelMap at 0x7f5e0590f938>
The labelmap_voc.prototxt consist of number of labels and corresponed names.
def get_labelname(labelmap, labels):
    num_labels = len(labelmap.item)
    labelnames = []
    if type(labels) is not list:
        labels = [labels]
    for label in labels:
        found = False
        for i in xrange(0, num_labels):
            if label == labelmap.item[i].label:
                found = True
                labelnames.append(labelmap.item[i].display_name)
                break
        assert found == True
    return labelnames
labelmap.item[2].label
2
caffe.set_device(0)
caffe.set_mode_gpu()
model_def = '/home/veronika/materials/cv/detection/models_trained/VGGNet/deploy.prototxt'
model_weights = '/home/veronika/materials/cv/detection/models_trained/VGGNet/VGG_VOC0712_SSD_300x300_iter_60000.caffemodel'
net = caffe.Net(model_def,      # defines the structure of the model
                model_weights,  # contains the trained weights
                caffe.TEST)     # use test mode (e.g., don't perform dropout)
We have to transform input image in special way for Caffe.
transformer = caffe.io.Transformer({'data': net.blobs['data'].data.shape})
transformer.set_transpose('data', (2, 0, 1))
transformer.set_mean('data', np.array([104,117,123])) # mean pixel
transformer.set_raw_scale('data', 255)  # the reference model operates on images in [0,255] range instead of [0,1]
transformer.set_channel_swap('data', (2,1,0))  # the reference model has channels in BGR order instead of RGB
image_resize = 300
net.blobs['data'].reshape(1,3,image_resize,image_resize)
transformer = caffe.io.Transformer({'data': net.blobs['data'].data.shape})
transformer.set_transpose('data', (2, 0, 1))
transformer.set_mean('data', np.array([104,117,123])) # mean pixel
transformer.set_raw_scale('data', 255) # the reference model operates on images in [0,255] range instead of [0,1]
transformer.set_channel_swap('data', (2,1,0)) # the reference model has channels in BGR order instead of RGB
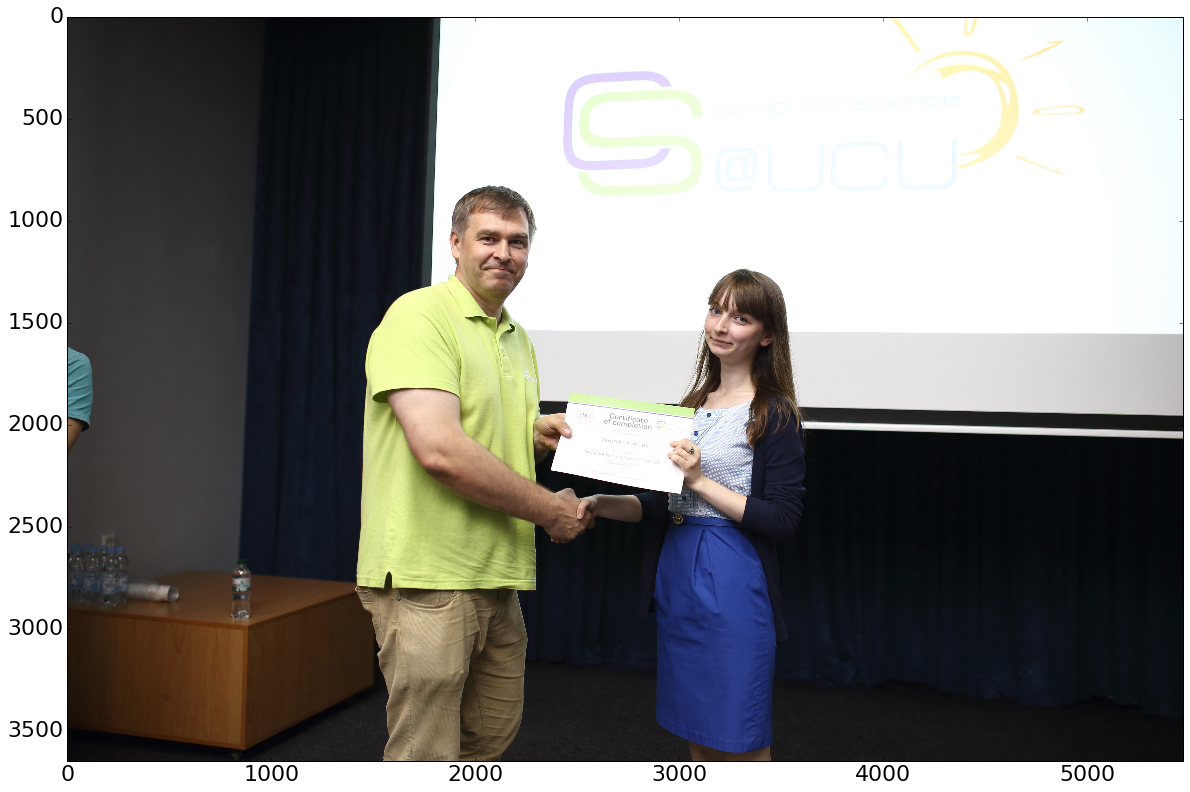
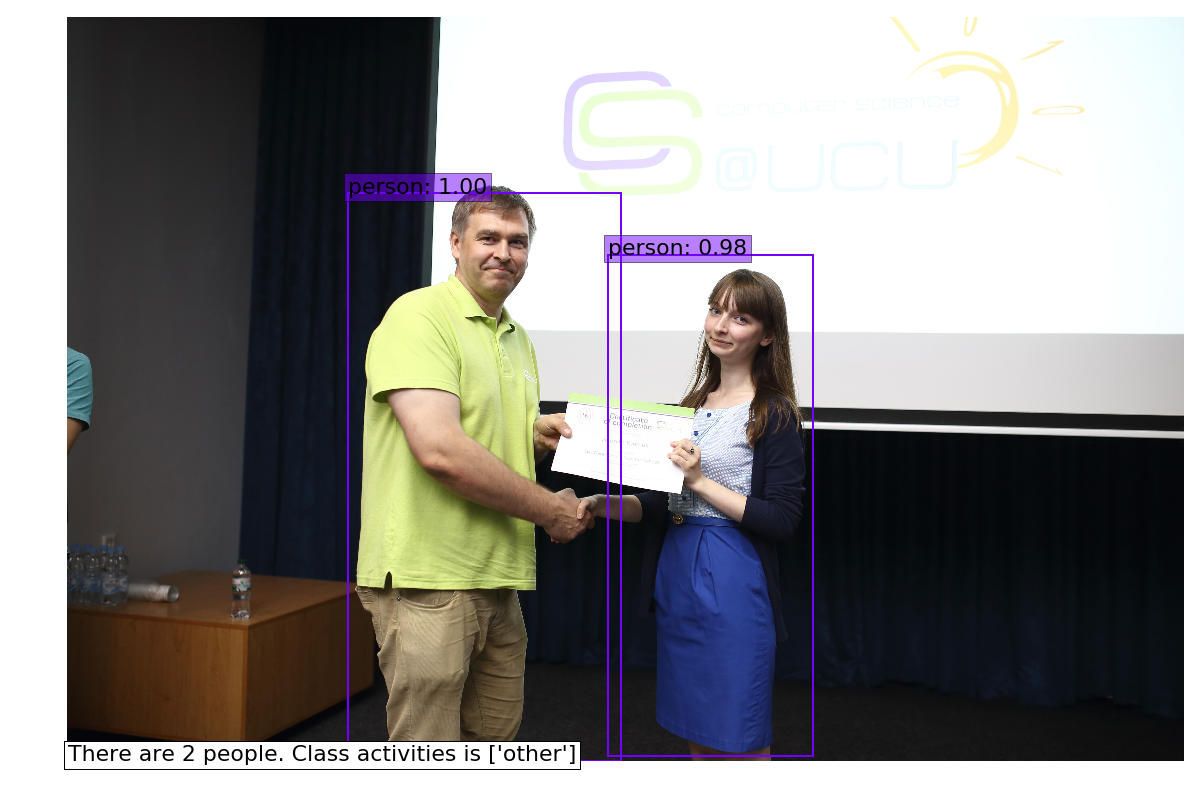
image = caffe.io.load_image('/home/veronika/photos/UCU2016/144.jpg')
plt.imshow(image)
#The photo is taken from closing ceremony of Lviv Computer Science School with me and Program director
#Yaroslav Prytula.
#Just for example!:)
<matplotlib.image.AxesImage at 0x7f5e0013fe90>
transformed_image = transformer.preprocess('data', image)
net.blobs['data'].data[...] = transformed_image

# Forward pass.
detections = net.forward()['detection_out']
detections.shape
(1, 1, 16, 7)
In order to get bounding boxes we use the following code.
# Parse the outputs.
det_label = detections[0,0,:,1]
det_conf = detections[0,0,:,2]
det_xmin = detections[0,0,:,3]
det_ymin = detections[0,0,:,4]
det_xmax = detections[0,0,:,5]
det_ymax = detections[0,0,:,6]

# Get detections with confidence higher than 0.6.
top_indices = [i for i, conf in enumerate(det_conf) if conf >= 0.6]

top_conf = det_conf[top_indices]
top_label_indices = det_label[top_indices].tolist()
top_labels = get_labelname(labelmap, top_label_indices)
top_xmin = det_xmin[top_indices]
top_ymin = det_ymin[top_indices]
top_xmax = det_xmax[top_indices]
top_ymax = det_ymax[top_indices]
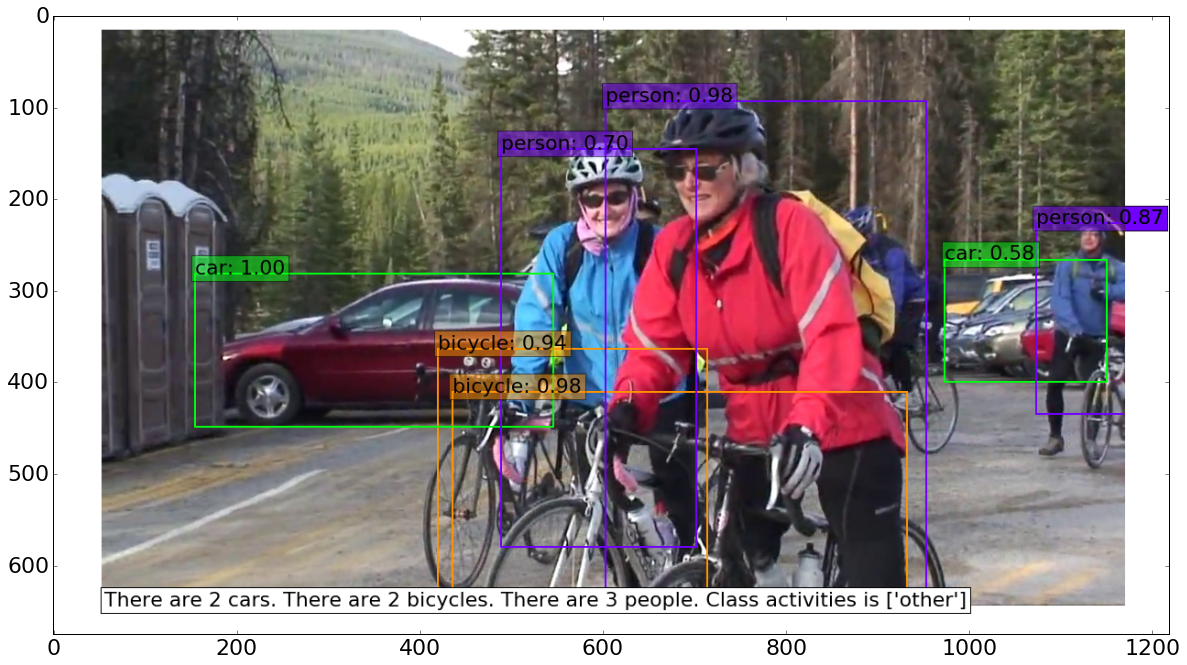
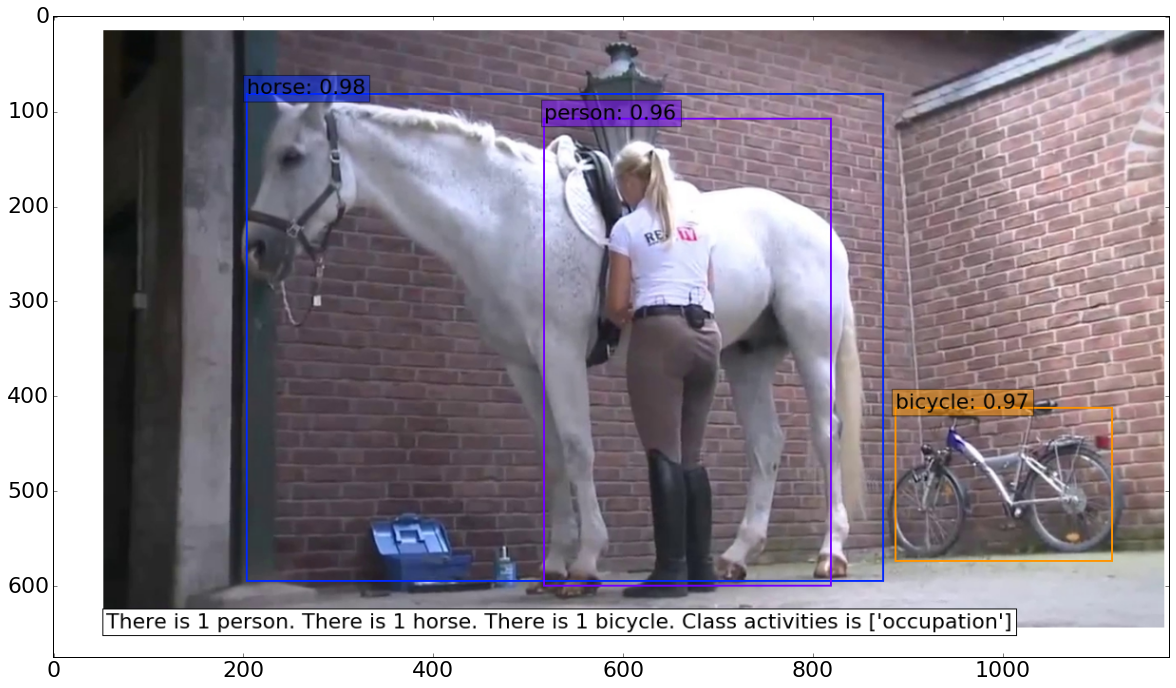
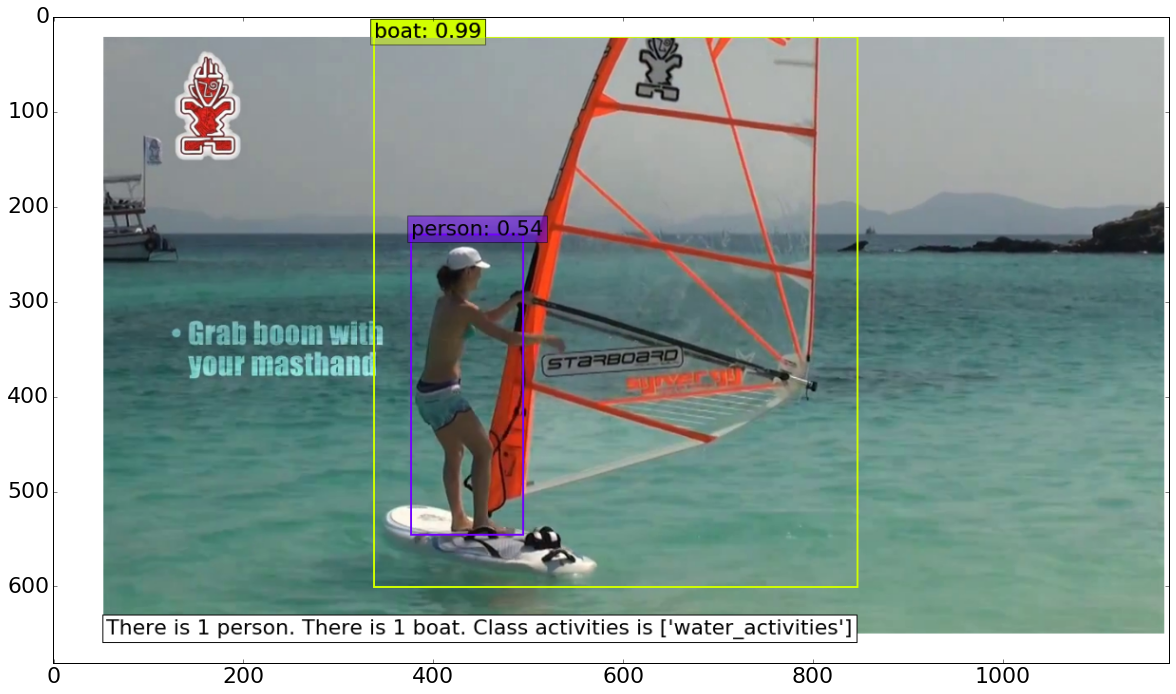
The result of object detection you may find at the end of the blog. The algorithm, that I used for object detection is SSD (Single Shot MultiBox Detector) All additional information you may find here https://github.com/weiliu89/caffe/tree/ssd
descr = dict((i,top_labels.count(i)) for i in set(top_labels))
descr
{u’person’: 2}
Creating a simple function for image description.
def get_description(descr):
    text_descr = str()
    for i in descr.keys():
        if descr[i] == 1:
            text_descr = text_descr + "There is" + " " + str(descr[i]) + " " + i + "." + " "
        else:
            if i == "person":
                text_descr = text_descr + "There are" + " " + str(descr[i]) + " " +"people" + "." + " "
            else:
                text_descr = text_descr + "There are" + " " + str(descr[i]) + " " + i + "s" + "." + " "
    return(text_descr)
The following part is about getting class activities labels, that I have got using transfer learning. A copuple of words about transfer learning. I got pretrained model for GoogLeNet topology and trained the model on MPII dataset. You may download the dataset here http://human-pose.mpi-inf.mpg.de/ I have increased learning rate in the last layer by a factor of 10 in comparison with learning rate in previous layers. The gradient descent optimization algorithm was Adam. My learning rate policy was _* base_lr: 0.0005
- lr_policy: “step”
- stepsize: 2000_
Moreover, I was able to get 95% accuracy on test set, that is 10% of whole dataset.
class_label = pd.read_csv("/home/veronika/materials/cv/detection/class_labels.csv", sep = " ", header = None)
class_label
| 0 | 1 | |
|---|---|---|
| 0 | 0 | running/walking |
| 1 | 1 | other |
| 2 | 2 | bicycling |
| 3 | 3 | conditioning_exercise |
| 4 | 4 | dancing |
| 5 | 5 | fishing_and_hunting |
| 6 | 6 | home_activities |
| 7 | 7 | home_repair |
| 8 | 8 | lawn_and_garden |
| 9 | 9 | music_playing |
| 10 | 10 | occupation |
| 11 | 11 | sports |
| 12 | 12 | water_activities |
| 13 | 13 | winter_activities |
image_resize = 224
net.blobs['data'].reshape(1,3,image_resize,image_resize)
transformer = caffe.io.Transformer({'data': net.blobs['data'].data.shape})
transformer.set_transpose('data', (2, 0, 1))
transformer.set_mean('data', np.array([104,117,123])) # mean pixel
transformer.set_raw_scale('data', 255)  # the reference model operates on images in [0,255] range instead of [0,1]
transformer.set_channel_swap('data', (2,1,0))

googlenet_root = "/home/veronika/materials/cv/cv_organizer/googlenet/adam4/"
model_config = os.path.join(googlenet_root, 'deploy.prototxt')
model_weights = os.path.join(googlenet_root, 'snapshot/_iter_3600.caffemodel')
net_act = caffe.Net(model_config, model_weights, caffe.TEST)

transformed_image = transformer.preprocess('data', image)
net_act.blobs['data'].data[...] = transformed_image

detections = net_act.forward()['prob']
action_label = class_label.loc[class_label[0] == detections.argmax()]
action_label = str(np.array(action_label[1]))
action_label = get_description(descr) + "Class activities is" + " " + action_label
colors = plt.cm.hsv(np.linspace(0, 1, 21)).tolist()

plt.imshow(image)
currentAxis = plt.gca()
plt.axis('off')

for i in xrange(top_conf.shape[0]):
    xmin = int(round(top_xmin[i] * image.shape[1]))
    ymin = int(round(top_ymin[i] * image.shape[0]))
    xmax = int(round(top_xmax[i] * image.shape[1]))
    ymax = int(round(top_ymax[i] * image.shape[0]))
    score = top_conf[i]
    label = int(top_label_indices[i])
    label_name = top_labels[i]
    display_txt = '%s: %.2f'%(label_name, score)
    coords = (xmin, ymin), xmax-xmin+1, ymax-ymin+1
    color = colors[label]
    currentAxis.add_patch(plt.Rectangle(*coords, fill=False, edgecolor=color, linewidth=2))
    currentAxis.text(xmin, ymin, display_txt, bbox={'facecolor':color, 'alpha':0.5})
    currentAxis.text(3, image.shape[0], action_label, bbox={'facecolor':"white"})
    #currentAxis.text(20, image.shape[0]-100, get_description(descr), bbox={'facecolor':"white"})
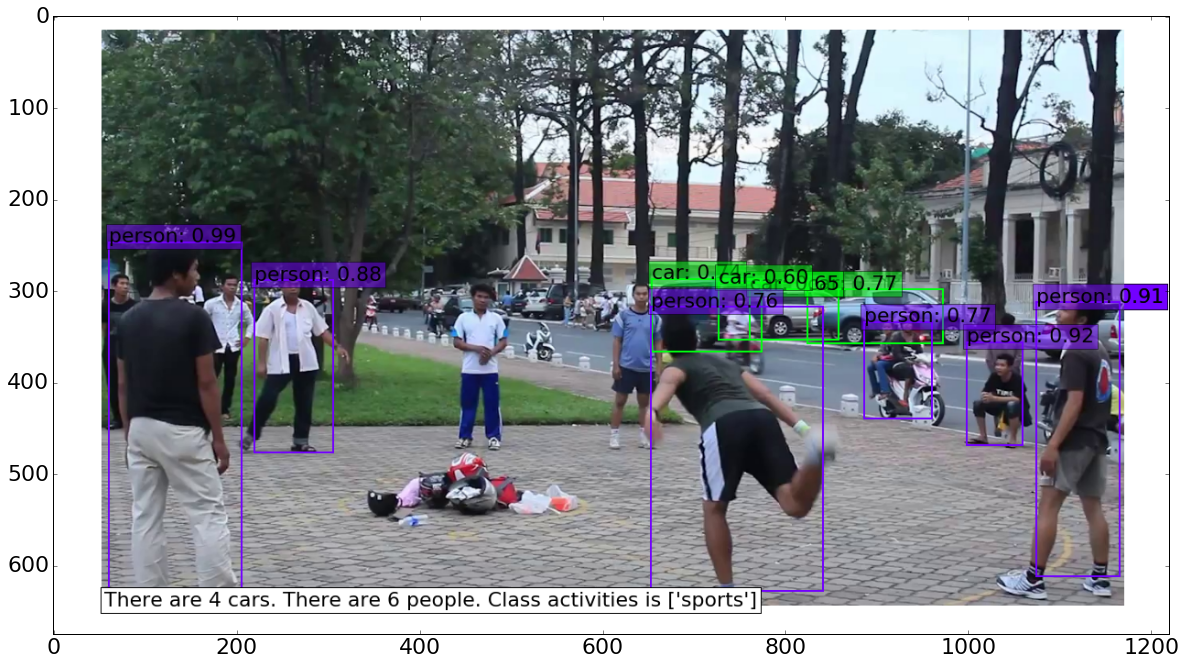
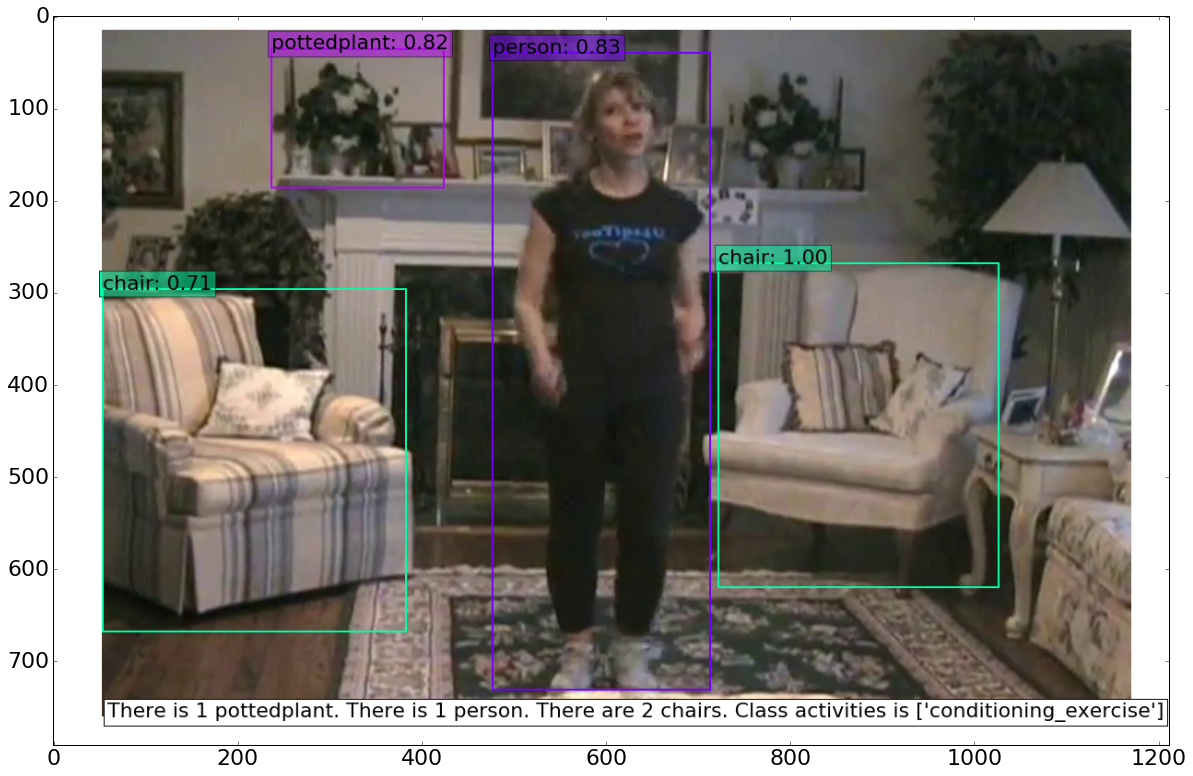
In addition, I would like to add some photos from test set.
<matplotlib.image.AxesImage at 0x7f5df97e2310>
<matplotlib.image.AxesImage at 0x7f5df9720750>
<matplotlib.image.AxesImage at 0x7f5df98e43d0>
<matplotlib.image.AxesImage at 0x7f5df95e0cd0>
<matplotlib.image.AxesImage at 0x7f5df951c990>
This is the end of main post about Classification and Detection methods using CNN. I decided to go deeper and analyse my test set. The analysis about distributions of classes with different certainties of model you may read in Part2